
“What if your tired kitchen could look bespoke in under a week – without ripping it out?” Microcement can deliver exactly that: a seamless, ultra-thin coating that refreshes worktops, splashbacks, floors and even cabinet faces with a cohesive, high‑end finish. In this guide, you’ll learn how to plan smartly (from mapping your layout and confirming moisture/heat suitability to setting site conditions), choose colours, textures and sheen that tie the room together, and follow a proven prep‑to‑sealer method that prevents cracks and keeps edges crisp.
Read about microcement: what is microcement
Smart Planning for a Microcement Kitchen Upgrade
You’re not throwing the whole room into chaos – you’re making strategic moves. Decide your goal: a quick refresh or a full re‑skin. Pick targets now: worktops, splashback, floor, island, cabinet faces. Sketch a simple plan in mm; mark door swings, appliance clearances and the classic hob–sink–fridge triangle. Check suitability like a pro: highlight high‑moisture (sink, dishwasher) and high‑heat zones (hob, oven sides), and decide how you’ll protect edges, cut‑outs and returns with trims or sealant. Lock down site conditions: 15–25°C, 40–65% RH, serious dust control, steady ventilation and a low‑VOC product plan. Keep it tight with a tick‑list: 1) Scope confirmed, 2) Substrate identified (MDF, tile, concrete), 3) Power/water access, 4) Protection materials ready (masking, sheeting, floor guards), 5) Disposal plan for sanding dust and offcuts. Example scenario: “Worktops + upstand, leave floor for later” – because the floor’s sound, the counters are dated, and you save two days on prep plus keep the kitchen usable. For estimating, draw a simple before/after plan: shade the coated areas and label totals – e.g., worktops 5.2 m², splashback 2.4 m², island 3.1 m² – so you can price microcement, primer and sealant without guessing.
Practical conclusions: choose surfaces that deliver the biggest visual hit for the least mess; secure the environment so microcement adhesion and curing behave; protect every vulnerable edge and opening; and use a measured plan to control materials, time and budget. Do this and your kitchen won’t just look sharper – it’ll wear hard, clean easily and feel intentionally designed, not patched together.
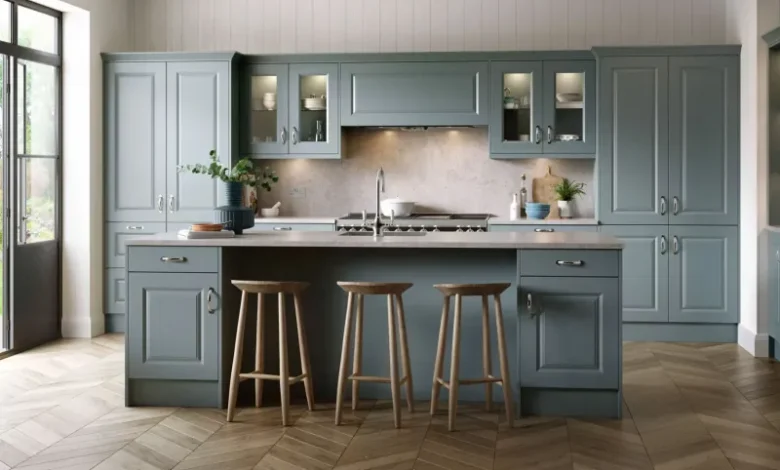
Colour, Finish and Texture Choices that Tie the Kitchen Together
Pick a clear intent for your space – warm, minimal, or industrial – and make every decision answer to it so the worktops, splashback and floor feel like one story. Lay out three swatches side by side – base tone, accent/edge, cabinet colour – and photograph them under daylight and under a warm LED (2700–3000K) to catch any ugly shifts. Keep finishes purposeful: matte microcement hides fingerprints on walls and cabinets, satin balances cleanability with softness on high-touch areas, and high-sheen is a spotlight move for a feature wall only – never for floors. On the deck, target R10–R11 slip resistance for busy family kitchens; on worktops, put stain resistance ahead of gloss. Keep one element identical on two planes (e.g., worktop + splashback) for a calm line. Avoid loud patterns; let microcement texture lead with subtle mottling and directional trowel marks where you mean it, nowhere else.
- Calm Scandi – Base: NCS S 2002-Y; Accent: oak trim, brushed steel; Finish: matte; Slip: R10; Pairs with: white matt cabinets, light oak.
- Modern Monochrome – Base: RAL 7043 (Traffic grey B); Accent: black powder-coated rails; Finish: satin; Slip: R10–R11; Pairs with: graphite doors, black appliances.
- Soft Industrial – Base: NCS S 4502-R; Accent: burnished brass handles; Finish: satin; Slip: R11 (floor); Pairs with: warm LED 2700–3000K, walnut veneer.
Quick rules of thumb that save you from repainting at midnight: – Matte microcement walls to mute glare; satin floors for easy mopping without that slippery look. – Keep base microcement cool if your cabinets are warm wood, and warm if your cabinets are stark white, so it doesn’t read clinical. – Edge details matter: a shadow gap or brass strip can pull the whole scheme together more elegantly than another colour. – If you crave drama, push it into lighting and hardware, not the substrate – the microcement should ground the room, not shout over it.
Surface Prep and Layer Build-Up: The Method That Prevents Cracks
Flawless microcement comes from process, not luck. Here’s the exact, no-fluff sequence that keeps kitchen worktops, splashbacks, and floors tight and crack-free, even under heat, steam, and daily abuse:
– 1) Protect: mask edges, cover appliances, set up dust extraction.
– 2) Assess substrate: tiles, MDF, cement screed, plaster – mark all movement joints.
– 3) Repair/level: fill tile grout lines, skim dips; sand flush.
– 4) Prime: correct primer per substrate (tile-bond, acrylic, or epoxy moisture barrier where needed).
– 5) Mesh: reinforce over joints/changes of material; wrap edges.
– 6) Base coat: 0.8–1.0 mm; trowel tight; dry fully.
– 7) Second coat: 0.5–0.8 mm; refine texture; de-dust.
– 8) Burnish/light sand; vacuum thoroughly.
– 9) Seal: 2 thin coats (PU or polyurea system), 12–24 h apart; respect cure times.
– Total thickness: 2–3 mm including sealer; never exceed 1 mm per coat.
– Moisture checks: cementitious substrates <5% CM; if unsure, apply epoxy DPM and schedule cure time.
Substrate specifics (keep it clean and fast):
– Tiles: degrease, abrade glaze, fill grout, prime for non-porous surfaces, mesh across tile lines.
– MDF/ply: seal faces and edges; use solvent-resistant sealer before primer; avoid flex.
– Existing screed: grind high spots; honour expansion joints through to finish.
– Plaster: fully cured, firm; prime to control suction.
- Common pitfalls: rushing sealer, skipping mesh on transitions, over-watering mixes, leaving dust before sealing.
- Tools: HEPA vacuum, mixing paddle, steel trowel + plastic trowel, 120–220 grit abrasives, wet film gauge for sealer.
- Pro tip for kitchens: respect cure windows, keep temperatures stable, and don’t load counters or mop floors hard until the sealer hits full cure – this is where long-term stain resistance and durability are won.
Timeline, Budget and Team: DIY vs Pro for Predictable Results
Decision rule: choose DIY for small, simple areas like a splashback or a single worktop; bring in a pro for floors, wet zones, or when time is tight. Here’s the clean, no-drama schedule for mild UK conditions: Day 0 – masking, protection, degrease; Day 1 – repairs/levelling, prime; Day 2 – base coat; Day 3 – second coat, refine; Day 4 – light sand/burnish, clean; Day 5 – sealer coat 1; Day 6 – sealer coat 2, light use after 24–48 h, full cure ≈7 days. Sequence around home life: plan no-cook days or set up a temporary prep area with a plug-in hob and kettle so the kitchen facelift doesn’t derail the week. For costs that don’t play games: Substrate repair/levelling £10–£25 per m²; microcement materials (incl. primer) £30–£50 per m²; labour/application £80–£150 per m²; sealer system £15–£30 per m²; mesh/edge profiles £3–£8 per linear m; dust control/consumables £50–£120 fixed; appliance uninstall/reinstall £60–£120 each; contingency 10–15%. One solid reality check: 28 m² total (8 m² worktops + 20 m² floor) ≈ £3,500–£6,400 + contingencies. Quick risk controls that save headaches: make a mock-up board first, lock the colour batch, get written cure times from the system datasheet, and schedule the final seal 48 h before use.
If you want predictable results rather than mystery outcomes, treat microcement like a precision finish, not paint. Keep the budget transparent, protect the timeline, and choose the team that matches the scope. For hiring, ask for proof of insurance, training on your chosen system (not “similar”), and two recent kitchen references you can actually call. Conclusion: tackle the small, low-risk zones yourself and book a certified applicator for floors, wet areas and tight deadlines – that’s how you get a sleek, durable finish without blowing the schedule or the budget.
Check out the microcement kits: https://festfloor.com/collections/microcement-for-kitchens
Care, Durability and Real-World Performance After the Makeover
Microcement kitchen care isn’t rocket science, but it does reward consistency. Daily routine: a pH‑neutral cleaner with a microfibre mop or cloth, wipe spills promptly, and stick felt pads under stools to stop abrasive wear. For heat and impact, use trivets for hot pans and a chopping board to protect those sleek sealed worktops – keep anything 70°C+ off the surface to maintain the finish. Stain control is straightforward: coffee, wine, oil – wipe within minutes; if a mark lingers, use a fine polish pad and top‑up sealer on the small area. Plan a reseal every 2–3 years in heavy‑use kitchens or 3–4 years for lighter traffic; it’s a quick, thin refresh that keeps the barrier tight. Performance that matters: 2–3 mm thickness yet surprisingly dense, floor slip resistance R10–R11 (tune with aggregate if your space needs more grip), indicative strengths around 30–45 MPa compressive and 8–12 MPa flexural (system‑dependent). Water protection lives in the sealer, so keep silicone fresh at sinks and edges. Quick fixes: hairline scuff – light polish, reseal spot; small edge chip – fill with colour‑matched paste, feather, reseal. Owner checklist: week one gentle use, avoid standing water, skip bleach and ammonia, and log your reseal date in the calendar.
| Feature | Microcement (Sealed) | Porcelain Tile | Quartz Worktop | Notes |
| Thickness | 2–3 mm | 8–10 mm typical | 20–30 mm | Ultra‑thin layer ideal for refurbs over existing substrates |
| Slip Resistance (Floors) | R10–R11 (with aggregate) | R9–R12 (finish dependent) | N/A (worktops) | Adjust grit in topcoat to hit R10–R11 |
| Compressive Strength | 30–45 MPa | >40 MPa | 70–100 MPa | Values vary by system and substrate |
| Flexural Strength | 8–12 MPa | 6–12 MPa | 10–20 MPa | Microcement needs a stable base |
| Stain Resistance | High (with sealer) | Very high | Very high | Keep sealer and silicone maintained |
| Heat Tolerance | Use trivets; avoid direct 70°C+ | Good; grout can stain | Good; avoid thermal shock | Sealer is the limiting factor |
| Maintenance | pH‑neutral cleaner; reseal 2–4 yrs | Mild cleaner; regrout as needed | Mild cleaner; rare reseal | Microcement wins on easy refresh |